Tech Solutions
Explore practical tech solutions, smart tools, digital services, and innovative ideas designed to solve everyday and business challenges.
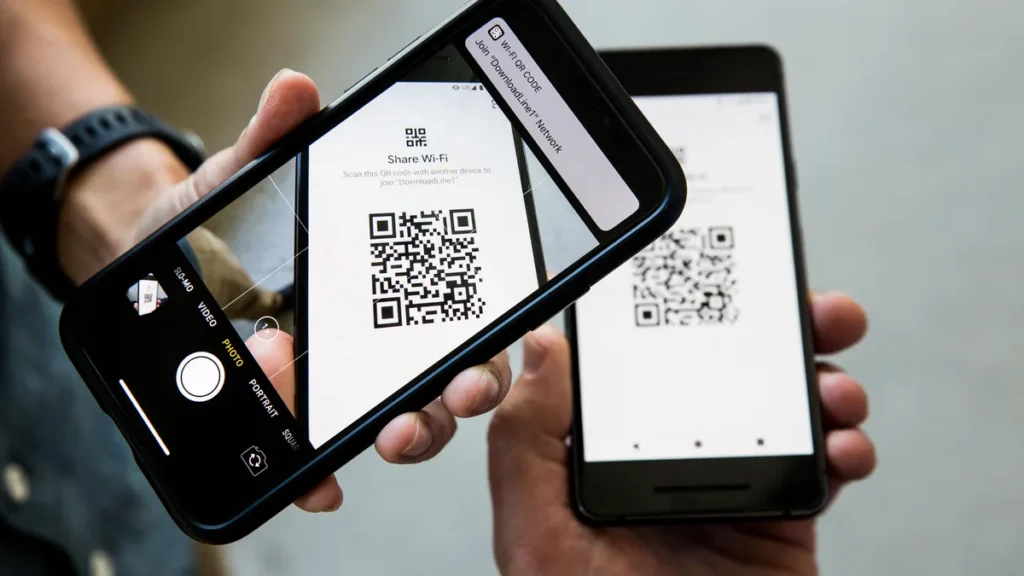
How to Share Your Home Network with a QR Code
Sharing your Wi-Fi password with guests doesn’t have to mean spelling out a long string of characters. With a QR code, you can let anyone connect to your home network in seconds—no typing required.
Here’s how to easily create and share a QR code for your Wi-Fi network on any device.
Why Use a QR Code for Wi-Fi Sharing?
- Convenient – No need to remember or write down long passwords
- Secure – QR codes can be encrypted and limited to certain users
- Cross-Platform – Most smartphones can scan QR codes using the built-in camera
- Perfect for Guests – Easily display it in your home or send it digitally
How to Generate a QR Code for Your Wi-Fi
Using an Online QR Generator
- Go to a trusted QR code generator like QR Code Generator or qrwifi.io.
- Select the Wi-Fi option.
- Enter:
- SSID (your Wi-Fi network name)
- Encryption type (usually WPA/WPA2)
- Password
- Click Generate to create the QR code.
- Download or print the code to display or share.
⚠️ Tip: Never share QR codes containing sensitive info on public platforms unless you’ve masked or blurred out the password.
For Android Users
- Go to Wi-Fi Settings
- Tap on your connected network
- Tap the Share icon (you may need to authenticate with your fingerprint or PIN)
- Your phone will display a QR code that others can scan
For iPhone Users
iOS doesn’t yet have native QR sharing for Wi-Fi, but you can:
- Use the Shortcuts app to build a QR code
- Or, use an online generator on Safari
For Apple-to-Apple sharing, use AirDrop or Wi-Fi Password Sharing from your Contacts.
How to Connect Using a QR Code
- Open the Camera app on your smartphone
- Point it at the QR code
- Tap the prompt to Join Wi-Fi Network
Most Android and iOS devices will instantly recognize and join the network without entering a password.
Final Thoughts
Creating a QR code for your Wi-Fi is a smart, secure, and user-friendly way to share your home network. Whether you’re hosting guests, setting up smart devices, or simplifying access for family, a QR code makes things faster and easier—without compromising your network security.
AirPods Pro Tips: 5 Ways to Boost Performance and Comfort
Apple’s AirPods Pro offer powerful features in a compact design — but many users don’t tap into their full potential. Here are five quick tips to help you enhance both performance and comfort:
1. Use the Right Ear Tip Fit
Your AirPods Pro come with three tip sizes. Use the Ear Tip Fit Test (found in Bluetooth settings) to ensure a secure, noise-isolating seal for better sound and comfort.
2. Enable Adaptive Transparency or Noise Cancellation
Toggle between Active Noise Cancellation and Transparency Mode to fit your environment. On iOS 17+, try Adaptive Audio for dynamic sound control throughout the day.
3. Personalize Controls
Customize the press-and-hold actions on each earbud via Settings → Bluetooth → AirPods Pro. You can assign Siri, ANC modes, or volume control for faster access.
4. Keep Firmware and iOS Updated
Apple often releases performance and battery optimizations. Make sure both your iPhone and AirPods Pro are updated to get the latest features.
5. Use Spatial Audio for Immersive Sound
Activate Personalized Spatial Audio for 3D-like listening when watching movies or using Apple Music. It’s a game-changer for immersive audio experiences.
5 Everyday Habits That Are Damaging Your High-End Devices

High-end smartphones, laptops, and tablets come with hefty price tags and we rely on them daily for work, entertainment, and communication. But while these devices are designed for performance and durability, your everyday habits may be quietly damaging them, reducing both their lifespan and resale value.
Here are five common practices that can harm your tech and how to avoid them.
1. Overcharging Your Battery
Most modern devices use lithium-ion batteries, which degrade over time. Keeping your device plugged in at 100% for hours like overnight can accelerate this degradation.
What to do instead:
- Unplug your device once it reaches a full charge.
- Use smart charging modes (available on many newer phones and laptops).
- Keep battery levels between 20%–80% for optimal health.
2. Ignoring Software Updates
Delaying or skipping software and firmware updates can do more harm than good. These updates often include vital security patches, performance enhancements, and bug fixes.
Why it matters:
- Outdated software can leave your device vulnerable to malware and cyberattacks.
- You may experience performance lags, app crashes, and incompatibility with new features.
3. Using Cheap or Uncertified Accessories
That $5 charger from an unknown brand might seem like a deal, but low-quality or non-certified accessories can damage your device’s battery, ports, or internal circuitry.
How to avoid it:
- Use manufacturer-approved or certified third-party accessories (look for MFi certification for Apple products, for example).
- Avoid fast chargers that don’t match your device’s voltage and wattage requirements.
4. Exposing Devices to Heat and Moisture
Excessive heat and humidity can destroy internal components. Leaving your phone in a hot car, using your laptop in bed with blocked vents, or bringing your device into the bathroom can all cause problems.
Best practices:
- Keep devices in cool, dry environments.
- Avoid charging or heavy gaming while in direct sunlight or hot conditions.
- Don’t leave your laptop on soft surfaces that block airflow (like blankets or cushions).
5. Neglecting Storage and Digital Clean-Up
A cluttered device with full storage, too many background apps, and outdated files can seriously impact performance over time.
Tips to maintain performance
- Regularly delete unused apps, old downloads, and large media files.
- Clear cache and temporary files.
- Use cloud storage to offload large data and backups.
Your expensive tech can last for years if treated right. By avoiding these everyday habits and adopting some simple preventative steps, you’ll extend the life of your devices, improve their performance, and save money in the long run.
Common Smartphone Problems That Can Be Fixed Easily

Smartphones are essential tools in our daily lives, but like any technology, they can run into problems. Fortunately, many common issues can be resolved without a trip to the repair shop.
1. Battery Draining Quickly
A fast-draining battery is a frequent complaint. Try reducing screen brightness, closing unused apps, and enabling battery saver mode. Replacing an old battery can also restore performance.
2. Phone Overheating
Overheating can result from prolonged gaming, charging, or direct sunlight. Remove the phone case, close background apps, and give your device a break to cool down.
3. Slow Performance
If your phone feels sluggish, clear cache data, delete unused apps, and check for system updates. A factory reset can help as a last resort.
4. Unresponsive Touchscreen
A frozen screen may just need a restart. If that doesn’t work, clean the screen and check for any software bugs.
5. App Crashes or Won’t Open
Update the app, clear its cache, or uninstall and reinstall it. Sometimes, a system update can fix broader compatibility issues.
6. Wi-Fi or Bluetooth Not Working
Toggle airplane mode on and off, restart your phone, or reset network settings. These steps often resolve connectivity problems.
7. Storage Full
Free up space by deleting old photos, videos, and unused apps. Cloud storage options like Google Drive or iCloud ca
Tenev: Tokenization Marks the Most Important Innovation of the Last Decade
Vlad Tenev: Tokenization represents a shift toward collective empowerment, echoing the evolution of modern heroism. While emphasizing humanity’s potential is vital, meaningful progress demands more than charitable intent it requires systemic innovation, sustainable growth, and structural change.
Amazon Prime Day 2025: Major Discounts on OnePlus 13 Series, Buds, and More Tech Deals
Amazon Prime Day 2025 is here, and it’s bringing some of the biggest tech deals of the year! Whether you’re in the market for a new smartphone, earbuds, or smart accessories, this year’s sale features incredible discounts on the OnePlus 13 Series, along with price cuts on the latest OnePlus Buds and other must-have gadgets.
Here’s a full breakdown of what’s on offer and why you should consider grabbing these deals before they’re gone.
Top Deal: OnePlus 13 Series
The OnePlus 13 and OnePlus 13 Pro are among the hottest Android phones of 2025. Known for their flagship performance, stunning displays, and ultra-fast charging, these phones rarely go on sale—making Prime Day the perfect time to upgrade.
OnePlus 13 Key Features:
Snapdragon 8 Gen 4 chipset 6.8” AMOLED QHD+ display with 120Hz refresh rate Up to 16GB RAM and 512GB storage Hasselblad triple camera system 100W wired and 50W wireless charging
Prime Day Deal:
OnePlus 13 (8GB/128GB): Was $899 → Now $749 OnePlus 13 Pro (12GB/256GB): Was $1099 → Now $899
Includes free 6-month screen protection and a fast charger in the box.
OnePlus Buds 4 Pro – High-End Audio on a Budget
Looking for premium wireless earbuds without the premium price tag? The OnePlus Buds 4 Pro bring impressive sound quality, ANC (Active Noise Cancellation), and a long-lasting battery—perfect for both work and travel.
Prime Day Deal:
OnePlus Buds 4 Pro: Was $149 → Now $99 Available in Cosmic Black and Lunar White
Highlights:
12.4mm drivers for punchy bass Spatial audio support 45dB Active Noise Cancellation Up to 39 hours battery with case
More OnePlus Accessories on Sale
Prime Day 2025 also includes bundle deals and discounts on OnePlus accessories, including:
OnePlus Watch 2: Was $299 → Now $229 Features AMOLED display, GPS, and 100-hour battery life OnePlus SuperVOOC Chargers (80W/100W): Up to 30% off Protective Cases and Screen Guards: Buy 2, get 1 free offer
Why You Should Buy During Prime Day
Exclusive Deals for Prime Members These discounts are only available to Amazon Prime subscribers. If you’re not a member, you can still sign up for a 30-day free trial to access all deals. Limited-Time Offers Many of these tech deals are lightning deals, meaning they could sell out quickly or expire within hours. Bundle Savings Amazon is offering bundle promotions—buying a OnePlus 13 device with accessories like the Buds 4 Pro or Watch 2 can save you an extra $50–$100.
How to Grab These Deals
Head to the Amazon Prime Day 2025 homepage. Log in with your Prime account. Search for “OnePlus 13 Series deals”, or click through the “Mobile & Tech” category. Add to cart and check out quickly quantities are limited!
How to Uninstall or Delete Apps on Any TCL Smart TV

Whether you’re freeing up space or simply removing unused apps, uninstalling apps from your TCL Smart TV is a quick and straightforward process. However, the method varies slightly depending on the TV’s operating system—TCL TVs typically run Roku TV, Android TV, or Google TV. Here’s how to remove apps on each platform.
For TCL Roku TV
Steps to uninstall an app:
- Press the Home button on your Roku remote.
- Navigate to the app/channel you want to remove.
- Press the
*(Options) button on your remote. - Select “Remove channel”.
- Confirm by selecting “Remove” again.
Tip: You can also remove channels from the Roku mobile app under the “Channels” section.
For TCL Android TV
Steps to uninstall an app:
- Press the Home button on your TCL remote.
- Go to the “Apps” section.
- Highlight the app you want to delete.
- Press and hold the OK/Enter button (or long-press with some remotes).
- Select “Uninstall” from the pop-up menu.
- Confirm the action.
Note: Some pre-installed system apps may not have an uninstall option, but you may be able to disable them.
For TCL Google TV (Newer Models)
Steps to uninstall an app:
- Press the Home button on your remote.
- Scroll to the “Apps” tab at the top.
- Select “See all apps” or locate the app you want to remove.
- Highlight the app, then press and hold the OK/Select button.
- Choose “View Details”, then select “Uninstall”.
- Confirm to remove the app.
What to Do If the Uninstall Option Isn’t Available
- Pre-installed apps (like YouTube, Netflix, or system utilities) often can’t be uninstalled.
- In some cases, you may only be able to disable these apps, which will prevent them from running or showing up on the home screen.
Bonus Tip: Clear Up Storage
After uninstalling apps, go to:
- Android/Google TV:
Settings > Device Preferences > Storage > Cached Data
You can clear cached data to free up space. - Roku TV:
Restart the TV after uninstalling apps to clear temporary files.