Replacing your iPhone 15 screen can be a bit tricky, but it’s doable with the right tools and guidance. Here’s a brief overview:
Replacing your iPhone 15 screen requires patience, attention to detail, and the right tools. By following this guide, you can successfully replace your screen and get your device up and running again. However, if you’re not confident in your DIY skills, it’s recommended to seek professional help to avoid damaging your iPhone. With the right approach, you can restore your iPhone’s functionality and enjoy a seamless user experience once again.
The iPhone 17 Pro models are reportedly getting an expanded camera bar, which could significantly change the device’s appearance.(kanedacane tweets/X)
iPhone 17 Pro Max Leaks Reveal Apple’s Shift to Battery-First Design The iPhone 17 Pro Max is expected to undergo significant changes, prioritizing battery life over sleek design. Here are the key takeaways¹:
Increased Thickness: The iPhone 17 Pro Max will reportedly feature a body thickness of 8.725mm, up from 8.25mm on the iPhone 16 Pro Max, to accommodate a larger battery.
Improved Battery Life: This design change is expected to result in better battery endurance, potentially giving the iPhone 17 Pro Max the best battery performance in iPhone history.
No Major Camera Upgrades: Unlike previous years, the Pro Max model won’t have significant camera upgrades exclusive to it, with power and practicality being the primary selling points.
Design Philosophy Shift: Apple seems to be rethinking its design approach, valuing usability and battery life over elegance and uniformity.
Potential Impact: This shift could signal a new era for flagship smartphones, where “flagship” means fully powered, not just ultra-thin.
This change in design philosophy could redefine what users expect from a flagship smartphone, prioritizing functionality and usability over aesthetics.
Whether you’re working from home, gaming, or simply browsing, running into computer problems can be frustrating. The good news? Many of these issues are common — and solvable with a few simple steps.
1. What Should I Do If I Spill Water on My Computer?
Spilling water on your computer can be scary — but quick action can prevent serious damage.
Here’s what to do immediately:
Turn off the computer and unplug it. If it’s a laptop, remove the battery (if possible). Flip the device upside down to help drain excess liquid and prevent further damage. Avoid using a hairdryer — high heat can damage sensitive components. Do not turn the device back on until it’s been properly inspected.
Important: Have your device professionally cleaned and evaluated as soon as possible. Even if it seems fine after drying, internal corrosion or short circuits can develop over time.
2. My Computer Won’t Turn On. What Should I Do?
When your computer won’t power on, it could be a minor issue — or something more serious. Start with the basics:
Try these steps:
Ensure the power cable is firmly connected to both the device and the outlet. Test the power outlet using another device to rule out a faulty plug. For laptops, try using a different charger if available. Look for any indicator lights or sounds — no lights may point to a power supply failure. If nothing works, it may be a motherboard or internal hardware issue. Seek professional repair support.
3. Why Is My Computer So Slow — and How Can I Fix It?
A sluggish computer is often caused by overloaded memory or outdated components.
Speed up your computer with these tips:
Run a virus and malware scan to rule out background threats. Uninstall unused programs and clear temporary files. Make sure your operating system and drivers are up to date. Upgrade your RAM or switch to a Solid State Drive (SSD) for faster performance. If your system is older, it may simply be time for a hardware upgrade.
4. What Should I Do If My Computer Is Overheating?
Overheating can shorten your computer’s lifespan and lead to sudden shutdowns or performance issues.
How to cool things down:
Clean out dust from fans and vents using compressed air. Make sure your device is in a cool, ventilated area. Consider replacing old thermal paste on the CPU. Use a cooling pad (for laptops) or add extra cooling fans (for desktops). Check that internal fans and sensors are functioning correctly.
5. How Do I Fix Software Crashes on My Computer?
Software that crashes frequently can disrupt your workflow and signal compatibility or resource issues.
Try this checklist:
Update the software to the latest version. Run a system update to fix known bugs and compatibility problems. Uninstall and reinstall the application. Check for conflicts with other programs running in the background. If the problem persists across multiple apps, consider doing a System Restore or resetting your OS.
6. Why Is My Computer Having Internet Connectivity Issues?
Losing internet access can be extremely frustrating, especially when working remotely or streaming content.
Steps to troubleshoot:
Restart your modem and router. Move closer to the router or use a Wi-Fi extender for a better signal. Update your network drivers — outdated software can cause disconnections. Run your system’s network troubleshooter to auto-detect issues. Still not working? Your ISP may be at fault, or your network card may need repair or replacement.
7. My Computer Has No Sound. How Can I Fix It?
Audio problems — whether it’s no sound at all or distorted output — can be caused by software, settings, or hardware.
Troubleshoot sound with these steps:
Make sure the system isn’t muted and the volume is turned up. Double-check that speakers or headphones are properly connected. Try another audio device to rule out hardware failure. Update your audio drivers to the latest version. Open your sound settings and ensure the correct output device is selected.
Final Thoughts
Tech issues happen to all of us, but many are easier to fix than they seem. Whether you’re dealing with a water spill, power issues, sluggish performance, or audio trouble, the key is to stay calm and work through a step-by-step troubleshooting process.
Need Help with Your Computer?
At Techy Solutions, we offer expert support for IT.
This is hands down the most frequent issue people run into. Though it may seem like either a blank screen or a frozen phone, it’s often the same problem — your device got stuck while it was idle.
💡 Why It Happens:
It usually comes down to your phone’s RAM (Random Access Memory), which acts like temporary workspace. RAM stores the data you’re actively using, so you can switch between apps quickly. But just like a cluttered whiteboard, if you keep piling things on without erasing anything, it becomes overloaded and messy.
Too many background tasks fill up your RAM, and eventually, your phone doesn’t know what to prioritize — that’s when it locks up or freezes.
🔧 Fix:
Clear your RAM. That’s why the first piece of tech advice is usually, “Try restarting it.” A restart wipes the RAM and lets your device start fresh.
Removable Battery Devices: Take the battery out, wait a few seconds, then reinsert it and power back on. iPhones or Sealed Devices: Hold the power button and volume down together for 10–15 seconds to force a restart (simulated battery pull).
💡 Tip: Do this at least once a week to keep things running smoothly.
2. Issue: Apps Won’t Open or Keep Crashing
Apps failing to load, freezing, or force-closing are frustrating — especially when it’s one you rely on every day.
💡 Why It Happens:
The app might need an update. Your phone’s operating system (OS) was just updated and the app isn’t fully compatible yet. In rare cases, the app has bugs that require the developer to release a fix.
🔧 Fix:
Check for Updates: On Android, go to Google Play Store > My Apps & Games On iPhone, go to App Store > Profile Icon > Scroll for updates Restart Your Phone: This can clear out minor glitches. Reinstall the App: Make sure your data (game progress, notes, etc.) is backed up — usually with a login or cloud sync. Uninstall the app, restart your phone, then reinstall it.
If it still doesn’t work, check the developer’s website or search online forums — many apps have user communities or help sections.
3. Issue: Phone Won’t Charge or Battery Drains Fast
A non-charging phone is panic-inducing, but don’t assume it’s dead just yet. There are several things to test before heading to the repair shop.
💡 Why It Happens:
Four main parts might be at fault:
The charging cable (most likely culprit) The battery The charging port The internal power circuit (least likely, but most serious)
Believe it or not, charging cables are intentionally designed to fail first. Why? It’s cheaper and easier to replace a $20 cable than a $500 phone with a broken port. Constant plugging/unplugging and using your phone while charging wears down the metal connectors.
Batteries can also wear out or swell. And if the port wiggles loosely, it may have become detached from the motherboard.
🔧 Fix: Try These Steps in Order
Test the outlet and cable: Use a different wall outlet. Try a different cable and charging brick (if available). Mix and match cables and chargers to isolate which component is failing. Let it sit: Leave the phone plugged in for 30+ minutes. Some phones need time to wake up from full battery drain. Check the battery: For removable batteries: Spin it on a flat surface. If it spins like a top, it’s swollen and needs replacing. For sealed phones (like iPhones): Visit a service center for a battery test. Inspect the port: Wiggle the charger gently when it’s plugged in. If it feels loose or unstable, it might be a damaged port. If nothing works: The issue may be internal (power circuit failure). Check your warranty or insurance policy — this is not a DIY repair.
✅ Final Advice:
Don’t panic — most phone issues are fixable at home with a bit of patience. Always try to narrow down the problem using a process of elimination. Keep your phone clean, updated, and regularly restarted to prevent many of these common issues.
Resetting your iPhone to factory settings will erase all content and settings, returning the device to the state it was in when you first got it. Here’s how to do it safely and properly:
🔄 How to Factory Reset Your iPhone
⚠️ Important: Back up your iPhone before resetting. This will ensure you don’t lose your data. You can back up via iCloud or iTunes/Finder on a computer.
✅ Step-by-Step Guide to Factory Reset
1. Back Up Your iPhone
iCloud Backup: Go to Settings > [Your Name] > iCloud > iCloud Backup Tap Back Up Now Computer Backup (Finder/iTunes): Connect your iPhone to your Mac or PC Open Finder (macOS Catalina and later) or iTunes (Windows or older macOS) Select your iPhone and click Back Up Now
2. Sign Out of Apple ID
Go to Settings > [Your Name] Scroll down and tap Sign Out Enter your Apple ID password and confirm
This step is crucial to disable Activation Lock, which will prevent the next owner from using your phone.
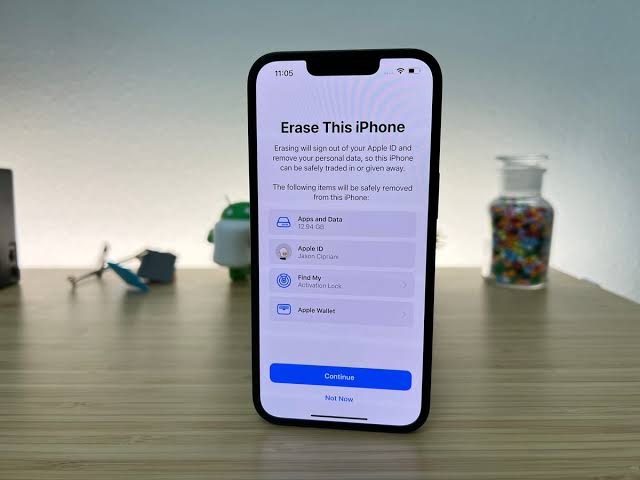
3. Erase All Content and Settings
Go to Settings > General > Transfer or Reset iPhone Tap Erase All Content and Settings Enter your passcode (if prompted) Confirm that you want to erase the iPhone
4. Wait for Your iPhone to Reset
Your iPhone will restart and display the Apple logo with a progress bar. Once done, it will show the “Hello” setup screen—just like when it was brand new.
READ: 5 IT Issues You Should Let the Experts Handle [Updated]
1. Cybersecurity and Data Protection Concerns
If you’re experiencing cybersecurity or data privacy challenges, you’re dealing with more than just a minor inconvenience—you’re exposing your business to serious risks.
Financial Risk
Delaying cybersecurity upgrades increases your chances of financial damage. This can happen through direct losses like ransomware attacks or scams, or indirect costs like forensic investigations and soaring cyber insurance premiums.
Reputation at Stake
Take the 2023 Oakland ransomware incident, for example. Public trust took a hit when sensitive data like Social Security numbers were compromised. Now picture your business in the same situation—having to explain to customers or partners that their private data was leaked. The fallout isn’t just operational—it’s personal and reputational.
Downtime Losses
The cost of being offline varies, but any downtime resulting from a breach means lost productivity and possibly lost customers. Every minute your business is down, you’re missing opportunities and revenue.
Legal and Compliance Issues
If your organization falls under regulations like HIPAA, PCI-DSS, or CMMC 2.0, any gaps in your cybersecurity posture could lead to fines or legal action. Noncompliance is not something you want to discover after a breach.
How to Fix It:
Start by conducting a comprehensive cybersecurity assessment. Follow up with best practices like enforcing strong passwords, using multi-factor authentication (MFA), keeping systems updated, and training your staff on security awareness. You should also consider investing in cyber insurance to help cushion the financial impact of potential threats.
2. Limited or Inadequate IT Support
It’s possible to get by with a small IT team at first. But as your business grows—more customers, more employees—the cracks in that setup start to show.
Without sufficient IT support, issues like recurring internet outages, data access delays, or system crashes can severely disrupt daily operations. Your staff ends up trying to solve tech problems instead of focusing on their core tasks, which impacts productivity.
How to Fix It:
You have two main options: hire more internal IT professionals or partner with a managed IT service provider. Hiring in-house provides direct access but takes time and resources. On the other hand, outsourcing your IT can offer scalable support, but the quality depends heavily on who you work with.
READ: Onsite vs. Offsite Technicians: Which Is Right for Your Business?
3. Not Enough Budget for IT Maintenance and Upgrades
Technology doesn’t last forever. Eventually, you’ll need to replace outdated systems or fix broken equipment. But many businesses don’t prepare for these expenses until it’s too late.
It’s understandable—expenses like payroll, taxes, and supplies often take priority. But failing to invest in IT can lead to larger problems later, such as non-compliance with new laws or exposure to vulnerabilities. Or maybe your devices will simply slow to a crawl, making work inefficient.
How to Fix It:
Identify high-impact areas for investment that deliver the most value. Look into flexible payment options like equipment leasing or business loans to fund essential upgrades. Leveraging cloud platforms or working with a managed service provider can also reduce upfront spending and help you scale IT solutions with your business needs.
4. Disconnected or Outdated Systems
Using systems that don’t “talk” to each other leads to duplicated work, miscommunication, and overall inefficiency. When data is stuck in silos and teams have to manually transfer information, productivity suffers.
How to Fix It:
Audit your current software and platforms to identify integration issues. Transitioning to unified solutions like enterprise resource planning (ERP) systems can centralize operations and boost efficiency. Also, using APIs (application programming interfaces) can allow your current tools to better connect and exchange data.
5. Outdated or Unsuitable Technology for Your Team
Your employees need reliable tools to do their jobs effectively. Outdated or ill-fitting technology can hinder performance, lower morale, and cause frustration—especially when it prevents them from meeting goals.
How to Fix It:
Regularly assess your team’s tech needs and provide tools that align with their roles. This includes updating hardware and software, and ensuring reliable access to necessary platforms. Offer training opportunities to help staff make the most of the tools they use and keep up with changing technologies.
If you have a smartphone, you may be familiar with the common problems that come with it. Smartphones are a staple of modern life and there are literally millions of apps available for them.
In this day and age, we rely on our smartphones for almost everything, from checking our bank balance to reading the news. But what happens when your phone starts to slow down or stops working altogether?
Here are some common phone problems and solutions:
1. Short Battery Life We live in a world where smartphones are a part of our lives. We check them constantly, we use them to answer emails, we use them for work, and sometimes they are even the only way we can communicate with people. But what happens when your phone runs out of power? You’re stuck until you can find an outlet or until you can get home.
Battery life is one of the most common problems faced by smartphone users today. A lot of people don’t know this, but there are ways to extend your battery life so that you never have to worry about not having enough juice left for some important calls or messages.
Solutions There are many ways to improve your phone’s battery life. Here are a few of the most effective:
– Decrease screen brightness: Many people leave their phones on full brightness, which is not only annoying for others but also drains battery power and causes eyestrain. Adjust it so that it’s not too bright, but still readable. – Turn off Wi-Fi and Bluetooth: Both of these features use up a lot of power, so if you don’t need them, turn them off. – Keep track of apps using data: There are many apps that automatically connect to the Internet without your knowledge, so make sure you know what all those apps are doing by keeping track of them in Settings > Data Usage. – Uninstall unused apps: Sometimes we install new apps without knowing what they do or how much they space take up on our phones. Go through your list of installed apps and remove any that aren’t being used anymore — they’re just taking up unnecessary space on your device. – Turn off location services when you’re not using them: You don’t need location services on all the time, so turn them off when you’re not using them. This will save a little bit of battery life every time you turn on a GPS-based app or service. – Use a dark theme: If your phone has the option to turn on Dark Theme, turn it on. The dark color scheme uses less power than white or light colors. – Check your battery usage: If you want to know which apps are draining your battery, you can find out by going into Settings > Battery > Battery Usage > Last 7 days. This will show you which apps have been using up the most battery over the last week.
For example, if Facebook has used up 8% of your battery over the last week then it could be because you’re always checking notifications or because Facebook has an auto-playing video running in the background all day long.
To stop apps from running in the background, go into Settings > Battery > Background App Refresh and switch off everything you don’t need to be doing automatically.
2. Overheating Overheating is a common phone problem because it can lead to other problems such as battery life and performance. An overheated phone can also cause the device to shut down in order to protect itself from damage.
While an overheated device might seem like a minor issue at first, it can become a more serious problem if you don’t take care of it quickly. If your phone is overheating frequently, there are steps that you can take to stop it from happening so often.
Here are some common causes of overheating phones:
– Using an app that requires a lot of processing power (like playing games) – Using your device while charging – Using certain apps when outside in hot weather – Using your phone when its battery is low.
Solutions If your phone is overheating, you can use any of these solutions to fix the problem
– Turn off the phone and allow it to cool down completely. – If you have a case on your phone, remove it and see if the overheating goes away. – Close all apps open in the background – If you are charging your phone while watching videos or playing games, then stop doing it! It will make your device heat up even more than before! – Don’t use too many apps at once! Only one app should be running at a time as multi-tasking causes more heating in smartphones. – Turn off Bluetooth, Wi-Fi, and Location services if they aren’t being used – If all else fails and none of these solutions work, we recommend taking your device to a professional repair shop where they can diagnose and fix the issue at hand.
3. Lack of storage space A phone with no storage is like a car with no gas — it’s not going anywhere. If your phone doesn’t have enough storage space, apps will shut down or crash, and the operating system will run slowly. You may also see notifications saying that there is not enough space left on your device.
Solutions The first thing you need to do is check how much space you have available on your device. To do this, go to Settings > Storage > Internal Storage. This will show how much storage you have on your device and also how much storage is used by apps and other files such as photos and music.
If there’s not enough space left on your device but only a few apps installed recently then deleting them may solve the problem (but only if they’re not essential). You can also try uninstalling unused apps from the Play Store or from Settings > Apps & notifications > App info > Storage usage > Clear cache or Clear data (this will remove all cached data for an app).
4. Water Damage If your phone has fallen in the water or been exposed to heavy rain, it is vital that you do not power on your device. Water damage can cause severe damage to the circuitry and motherboard of your device. It can also corrode the battery, which can lead to fire or explosions.
Solution If you suspect that your device has been damaged by water, turn it off immediately and bring it to an authorized service center, such as Carlcare, for proper evaluation.
5. Blurry Camera The camera on your phone is one of the most important features. It’s how you take pictures and videos, and it’s also used for skype calls, so when the camera isn’t working properly it can cause a lot of problems. Many people have a problem with the blurry cameras. It can be due to a smudged lens or weak focus
Solution To fix this problem, simply wipe the lenses with a microfiber cloth or lens cleaning solution. Don’t use anything abrasive like paper towels or tissue paper because it will scratch the lens and make it worse. If the problem persists, you should take your device to an authorized repair facility.
6. A Faulty Charging Port A defective charging port is one of the most common problems that occur with smartphones. The charging port can be damaged by water, dust, or physical abuse. When a smartphone is dropped in water, it can damage the charging port and other parts as well. If your phone does not charge or charges slowly when plugged in, it may have a faulty charging port.
Solutions One of the best slow-charging solutions is to inspect your phone’s charging port and see if there is any debris stuck inside it. Use a soft toothbrush to remove any dirt that may be causing the problem. If there is no debris visible but your phone still refuses to charge, try rebooting your phone. You may also want to try another charger to see if your old one could be faulty as well.
7. A Lagging Phone A lagging phone is a problem that can be very annoying, especially when you’re playing a game or using an app that requires a lot of processing power. The good news is that there are several ways to fix this problem.
Solutions Troubleshooting a lagging phone is an easy process. You just need to follow the below-mentioned steps in order to fix the problem.
– Clear the Cache: The cache is used by the device to store temporary data. It may occur that the cache is full and it starts to consume more resources than it should. In order to solve this problem, you can clear the cache. It will not only resolve your problem but also increase your phone’s performance as well. – Restart Your Device: This is another common method of resolving any software-related issue on your android device. Most of the time restarting solve all issues related to lagging or hanging of your device. Restarting clears all temporary files from RAM which might be causing this issue. – Update Your Device: Updating your device regularly can help you in resolving many issues including phone hanging solutions. You can update both the operating systems as well as apps on your device through play store app itself when prompted for updates by the Google Play Store app itself (under my apps section).
8. Android Freezes or Crashes Frequently This is one of the most common problems that users experience with their phones and tablets. The reasons behind this issue vary from one device to another, but they include:
– A low-quality SD card or internal storage space – Incompatible apps installed on your device (especially after an update) – An outdated operating system or firmware version – Corrupt data in the internal storage of your device.
Solutions First, make sure that your device has enough storage space available for the app to work properly. If not, clear up some space by deleting unnecessary files and apps. If this doesn’t help, try rebooting your device by pressing the power button for 10 seconds until the power menu appears, then choosing “reboot”. If all else fails, contact a skilled technician for further assistance.
9. Phone Won’t Turn On/Boot Up If your phone won’t turn on or boot up, then there’s probably something wrong with its hardware or software components. The most common reasons for this problem are:
– Software corruption due to malware attacks or virus infections – Corrupted firmware due to improper flashing procedures – Damaged hardware components such as RAM chips, hard drives, processors and other internal components.
Solutions Try charging your phone with a different wall adapter and cable. If your phone still won’t turn, hold the Power button for at least 10 seconds. If the screen doesn’t light up or if you hear a sound, release the button and try again.
If the screen still doesn’t light up, press and hold down the Volume Up key with one hand while pressing and holding down the Power key with your other hand.
If the problem persists then contact a professional phone repairer for further assistance.
10. Hardware Defects Hardware defects can be caused by a number of different things. Some of the most common hardware defects include:
– Battery not charging properly. – Screen not working properly or cracked screen. – Speaker issues or no sound coming from speakers. – Touchscreen not working properly or unresponsive to touch input.
These types of issues can be caused by a number of different things, some of which are listed below:
Water damage – If your phone has been exposed to water it could have serious internal damage that will make it impossible for us to repair. In this case, we would recommend sending your phone back to the manufacturer for repair as they will have the best tools and parts needed for the job.
Dropped phone – Dropping your phone can cause all sorts of issues from cracked screens to damaged motherboards, if you drop your phone then chances are it needs replacing as there is no way we can fix this kind of damage.
Solution Sometimes you may be tempted to fix your smartphone phone yourselves with DIY videos from YouTube, but this is not advisable at all as it can damage your phone permanently.
If you have any kind of problem, especially hardware problems and software issues, you should take it to an expert phone service Centre.
We are dedicated to providing our customers with fast, efficient service at affordable prices. Our technicians are knowledgeable and experienced in itel phone repair, TECNO phone repair, and Infinix phone repair.
If you purchased it directly from Apple, then it is most certainly not refurbished, but is rather a new device. But, and iPhone is what it is it, internal hardware connect be changed. So, it’s a matter of looking for scratches and looking at the screen for a cover on it. If anything is of concern, it is a matter of it being jailbroken. And the only way to know if that has happened, is if you are aware of that being the case –there is no want to know on your own. Sin all, I recommend purchasing it from Apple, and none other.
Verifying a Genuine iPhone:
Here is how to confirm that the iPhone is genuine…